Saturday 29 October 2011

10/29 Digital Photography School » Photography Tips and Tutorials

     
    Digital Photography School » Photography Tips and Tutorials    
   
Master a Master: Weekly Photography Challenge
October 28, 2011 at 2:32 PM
 

This week your photography challenge is to ‘master a master‘. The idea was suggested by Vanessa Almodóvar on our Facebook page and is a pretty simple concept.

Image by joanneteh_32

Simply find a photo that you love from a favourite photographer and try to emulate it in some way. Hopefully in doing so you’ll learn something about that photographers technique that will help in your own photography.

Alternatively you might like to choose a painting from an artist that you love to inspire you.

Once you’ve taken your ‘Master the Master’ Images – choose your best 1-2, upload them to your favourite photo sharing site and either share a link to them or – embed them in the comments using the our new tool to do so.

If you tag your photos on Flickr, Instagram, Twitter or other sites with Tagging tag them as #DPSMASTER to help others find them. Linking back to this page might also help others know what you’re doing so that they can share in the fun.

Also – don’t forget to check out some of the great shots posted in last weeks Primary Color challenge where there were some great shots submitted.

Post originally from: Digital Photography Tips.

Check out our more Photography Tips at Photography Tips for Beginners, Portrait Photography Tips and Wedding Photography Tips.

Master a Master: Weekly Photography Challenge


Halloween Photography Tips
October 27, 2011 at 10:01 AM
 

With Halloween just a few days away I thought it was time to update our Halloween Photography Tips article with some new information and photos.

Photography Tips to Keep in Mind for Halloween

There are plenty of subjects around to photograph at Halloween ranging from the traditional jack-o-lantern through to people in costume, to trick or treat ‘treats’ etc. It’s a time of color, emotion and lots of interesting subjects.

The keys to capturing them are not that different from the normal keys to good composition in photography. As you photograph Halloween this year keep in mind some of the basics of good digital photography. I’ve selected the following tutorials that we’ve written before that should be helpful in your Halloween photography:

Get more tips like this by Subscribing to Digital Photography School

Find Points of Interest

Before hitting the shutter ask yourself ‘what is the focal point (or point of interest) in this image?’ All good images have something in them that holds the attention of those who view them – learn more about focal points and how to enhance them here.

Rule of Thirds

One way of enhancing the composition of your shots is to place your points of interest inn smart positions. While the rule of thirds can be broken with great effect it’s a useful principle to keep in mind.

Fill Your Frame

Halloween is a time of drama and you can add to this in your images by getting in nice and close and filling the frame with your subjects. Whether it’s people or objects – getting in nice and tight will usually add punch to your shots.


Give Subjects Space to Look into

When photographing people one of the most effective compositional techniques is to use the space around their faces effectively by giving more room on the side of their face that they’re looking into.

Find Fresh Angles

I suspect that the day after Halloween that photo sharing websites will be filled with images of pumpkins that all look much the same. Make your images stand out by finding fresh perspectives to shoot from.

Photograph the Details

It’s easy to be distracted by the flashy parts of a time like Halloween but it’s often when you step back, take a look around and notice the smaller details that you find the ‘money shots’. Times like Halloween are filled with all kinds of smaller details and photo worthy moments including decorations, carving the pumpkin, people getting dressed in costumes, sleeping kids at the end of parties, bags full of treats at the end of the night, the ‘fangs’ in Aunt Marie’s mouth, before and after shots of parties, close ups of food etc

Group Photos

Halloween is a time that people gather together and it’s an ideal time to practice your group photo techniques.

Image by John Althouse Cohen

Candid Photography

Halloween parties are a great time to get your camera out for some candid photos of your friends and family having a great time dressed up in all manner of costumes. Check out these 11 candid photography techniques.

Shooting in Low Light

The type of images that come to mind when I think of Halloween are fairly dark and spooky ones – candles in pumpkins etc. After all, the real action of Halloween seems to happen after dark. As a result you’ll want to think carefully about the light sources for your shots.

To really capture the mood of these situations you’ll want to avoid the stark and bright light of flash photography (or will want to at least pull it back a few stops and diffuse it) and so you’ll need to switch off your flash and do one (or all) of three things to some extent (this is from our exposure triangle series of posts):

  • increase your ISO – the larger your number the more sensitive your image sensor is to light and the darker conditions you can shoot in without having to slow down shutter speed. On the downside you’ll get more grainy/noisey shots.
  • slow down shutter speed – choosing a longer shutter speed lets more light into your camera. On the downside you’ll see any movement in your shots blur (which might add to the spookiness of the image but could also ruin it). Consider using a tripod if you lengthen your shutter speed.
  • use a larger Aperture – this widens the hole in your lens and lets more available light in. It will also lessen the depth of field in your shots. If you have a DSLR with a few different lenses is to use the ‘fastest’ lens you own as it will let you choose larger apertures. For example my f1.4 lens handles low light much better than my f4 lens.

Diffuse Your Flash

Another strategy that I’ve heard of some readers doing at this time of year is diffusing the flash on your camera with colored cellophane to try to lesson its impact upon your shot and also to give the light it produces a glow that might add to your shots – Red might be a good color to try. You’ll probably want to test this before the big night as getting the right density of diffuser will be critical.

Jack-o-Lanterns

Photographing Jack-o-Lanterns is particularly tricky as to get the full effect of the glowing inside the pumpkin is a bit of a tightrope walk between overexposing and underexposing due to the light and dark patches in the shot you take. Instead of just one candle inside it is probably worth using two or three to give a little extra light. Also take a number of shots at different exposures (exposure bracketing) and you should get one or two that give you the impact you’re after.

Got some Halloween Photos to Share? Post them we’d love to see them over at our Forum.

PS: here’s one more shot from one of our forum members who has submitted some amazing pumpkin carving photographs here:

Halloween-Photography-Tips-2

Get more tips like this by Subscribing to Digital Photography School

Post originally from: Digital Photography Tips.

Check out our more Photography Tips at Photography Tips for Beginners, Portrait Photography Tips and Wedding Photography Tips.

Halloween Photography Tips


Camera Therapy: How Photography Gave Me Hope Again
October 26, 2011 at 9:11 AM
 

The following is by a dPS reader – Shaun. It started as an email to me from him – however it was so powerful that I convinced him to allow us to publish it as a post. I hope that he might also one day let me convince him to share some of his photos too! Please Share this! – Darren

Shaun’s Story

In June of 2009 I was involved in a serious traffic accident that left me in a coma for several weeks and unable to walk or use my left arm. The list of injuries I have are longer than I can include here and so the last 2 years of my life have largely been spent for me in hospital or rehabilitation centres.

Much of my past life is a distant memory – things I used to take for granted and do without thinking take hours of effort to achieve, friendships have changed as I’ve become reliant upon others to survive and for a long time I lived without much hope. Depression became a state I lived in 24/7.

Camera Therapy

Around 6 months ago, and as part of my rehabilitation, my therapist suggested that I try to introduce something creative into my life. I think he was just trying to get me to think of something outside of my situation. He suggested painting but also mentioned in passing another patient who had taken up photography.

Being a techy guy (in my past life) I liked the idea of getting a camera and after a lot of research purchased a small four thirds format camera (a Panasonic GF1). I wanted a DSLR but due to their size and my limited movement (I do everything with one hand) I went for a lighter and smaller camera.

I also spent a heap of time on your website since buying the camera. I’ve not taken photos before but dPS has taught me a lot!

Over the last 6 months my life has changed a lot. Physically I’m improving a little – although still live life in a wheelchair and am very restricted in my movement – but emotionally I’m a different guy and much of it is a result of photography.

My Photographic Challenges

Pictured: Photographer using the 'Mount Mover'

There are a lot of challenges to take a simple photo for me. For example:

  • Getting to a location to photograph can be tough – I like street photography and landscapes and much of my life is confined to my small apartment or rehab centres.
  • Keeping my camera still – I ended up getting a small Tripod attachment welded by a friend to my wheelchair which has helped me a lot. Now my camera is in front of me any time I’m in my chair. I’ve since found purpose made mounts for wheelchairs and have just ordered one (the Mount Mover) – this will also enable me to consider a DSLR.
  • Just taking a shot – when I’m out with other photographers I notice that they are able to take a lot of shots from different angles and compositions that I’m not able to get.

How Photography Gives Me Hope

However despite the challenges photography has made me feel alive again. It has become a very therapeutic thing.

  • It gives me something to think about that is not related to my pain or injuries.
  • It gives me motivation to get well again.
  • It takes me out of sitting alone in my apartment.
  • It has given me dreams for the future.
  • It has given me a social interaction with other photographers (online and in real life).

My photos are not as technically brilliant as many of your authors – but that’s not what photography is about for me. For me it is a part of getting well and celebrating life, something I never thought I’d do again.

A Tip for Able Bodied Photographers

One ‘tip’ that I’d like to give other photographers is to ‘SLOW DOWN’. One of the bonuses of living my life is that nothing happens fast. As a result I see a lot more than I think many other photographers do. I also am forced to consider every element of my shot – composition, light, settings etc.

I see a lot of photographers racing around to get their shots. Not considering what they’re seeing and just snapping off a heap of shots very quickly and racing on to their next location. I suspect a lot of photographers could learn a great deal by slowing down.

If you have a story (big or small) about how photography has given you hope we’d LOVE to hear it in comments below.

Post originally from: Digital Photography Tips.

Check out our more Photography Tips at Photography Tips for Beginners, Portrait Photography Tips and Wedding Photography Tips.

Camera Therapy: How Photography Gave Me Hope Again


Bob Holmes: Natural Lighting and Travel Photography Tips
October 25, 2011 at 3:05 PM
 

A photographer that I’ve long admired is award winning Bob Holmes who is a renowned travel photographer. Bob’s won many awards including Travel Photographer of the Year (3 times), has 46 books and has been featured in many major publications including National Geographic.

In the following video Marc Silber interviews Bob Holmes on the topic of Natural Lighting and travel photography – I hope you find it as insightful as I did.


Some key take away advice from Bob Holmes that I took away:

  • Learn to Look at Light – as the camera looks at it
  • The important thing about taking good photographs is not to be worried about it
  • Cameras get in the way of good photography – if you’re always adjusting your camera you’re not looking intensely enough at your subject
  • Even Bob occasionally forgets to check his ISO and shoots at the wrong level
  • Research is a big part of Bob’s travel photography. He travels as light as possible with just a few of lenses and DSLRs
  • ‘Seeing’ is the most important aspect of photography – most people look but don’t see. Equipment is secondary.
  • Composition – always scan the edges of your frame. Be aware of what you’re cropping out and including.
  • Photography is deceptively simple – keep shooting!

Post originally from: Digital Photography Tips.

Check out our more Photography Tips at Photography Tips for Beginners, Portrait Photography Tips and Wedding Photography Tips.

Bob Holmes: Natural Lighting and Travel Photography Tips


7 Creative Ways to Use A Ring Flash
October 25, 2011 at 9:36 AM
 
I'm gone get you........
I’m Gonna Get You by Ragoem

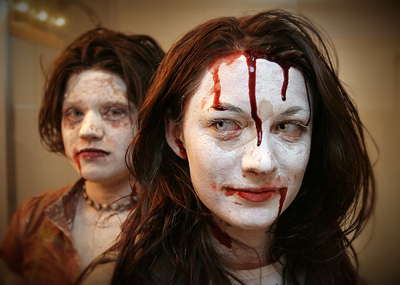
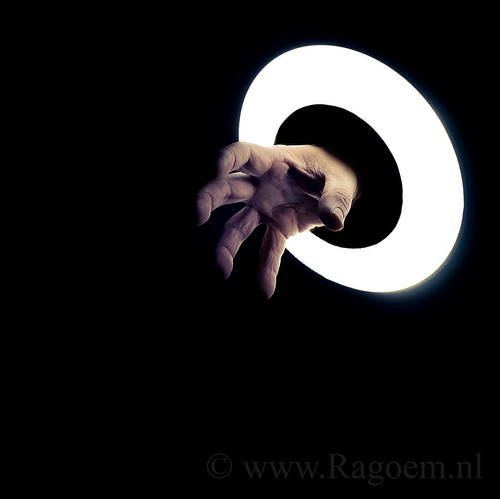
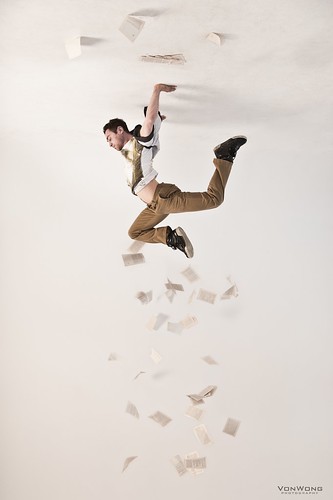
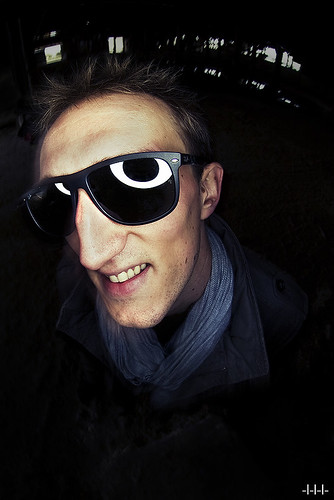
Ring flashes (or ring lights) provide some awesome light. They are very common with the fashion industry where they are used to create a glamorous look. However if you want to use one the lights they use on high-end fashion shots, be prepared to say good bye to a couple of Big Ones. The oddly shaped – around the lens – modifier, combined with lots of lighting power does not come cheap.

Luckily new, easy on the pocket, rings lights like the Orbis ($200) and the DIY Ring Flash ($25) provide access to this wonderful tool to the budget minded photographer as long as they own a small hot shoe strobe.

With the wider availability of ring flashes, I thought it would be nice to explore seven ways (both orthodox and unconventional) to use ring flashes.

Use It For Subtle Fill

The most common use for a small ring flash is to use it to create a subtle fill light. Since the light is coming from 100% on-axis, it has very little effect on the scene other than to provide additional light.

Greg "Krypto" Selinger

Photographer Benjamin Von Wong explains how you create such a photograph:

Use It For Framing

Though it is not trivial, it makes sense to use the ring of light coming from the strobe as a framing element – it provides a perfect white circle of light:

Pow!
POW! by EJP Photo

The interesting thing, is that using an ultra wide lens (like 8mm wide) you can also use the edges of the ring as framing element while placing the lens behind it. This is demonstrated by photographer Fallon Chan

The "Jarvie" window
The “Jarvie” window by Fallon Chan

Use It To Expose Details On a Hard Light Shot

David Hobby A.K.A Strobist came up with one of the coolest and interesting ways to use a ring flash. Using several strobes as hard lights he creates a contrasty scene. Then he uses a ring flash as fill to add details to the final photograph. you can learn more about this technique here and here.

Bionic Arm
Bionic Arm by Bionic Arm

Use If For Interesting Catch lights

One of the most visible signatures of ring lights is the unique shaped catch lights they produce.

Since the light is coming from a bagel shaped source, they catch light it produces is bagelled as well. This is wonderfully illustrated in John Winters photograph.

50" ringlight
50″ ringlight by 50″ ringlight

If you are going towards this look, one thing that you need to take care of is the distance between the ring flash and your subject. The closer the ring light, the more prominent the catch light effect will be.

Of course, if you are into catch lights, you may want to try having your subject ware sunglasses. While I am not sure that this would qualify as ring light per se, the effect is well worth trying. And if you want to take this into extremes you can always add some star patterns into the ring light.

DGTL PHTGRPHR - Magic Cyril Johnson
DGTL PHTGRPHR – Magic Cyril Johnson by Steven Monteau

Use It As Key

Of course it is always an option to use a ring flash as strong key light or even a single light. This is where you can see the “signature” lighting pattern of the ring light at its best. Note the halo of shadow originating around the model as the light hits her exactly from the lens center.

Ray Flash Ring Light
Ray Flash Ring Light by Ian Wedlock

Use It For Macro

If you opt to photograph the small things, a ring flash is your perfect companion. Its even illumination is great for macro shots where you need very soft light.

Refraction 001
Refraction 001 By LULZ Photography

Use it As Softbox

Lastly, you can forget the fact that this is a ring flash at all and simply use it off camera and off axis as a small softbox.

This is exactly what Tomer Jacobson did for Nadia, his model. Using a Lastolite Triflector Speed-Lite as soft glamorous light with a ring flash coming from top left and actually acting as a softbox to add a bit of directional light.

Your Turn

Are you using ring flash at all? Got any favorite ring flash image? How will you use (or have you used) a ring flash to take great photographs?

About The Author

Udi Tirosh runs DIYPhotography, and makes great photography products.

Post originally from: Digital Photography Tips.

Check out our more Photography Tips at Photography Tips for Beginners, Portrait Photography Tips and Wedding Photography Tips.

7 Creative Ways to Use A Ring Flash


This email was sent to putitshere@gmail.com.
Delivered by Feed My Inbox
PO Box 682532 Franklin, TN 37068
Create Account
Unsubscribe Here Feed My Inbox