| One of the more popular tutorials that has been written and shared in the dPS forums was the following one from one of our members – LeeR on ‘Levels’. While written last year it continues to be popular with readers so I thought I’d reshare it here on the blog. One of the questions I see most frequently on DPS is “How can I give my images that professional ‘pop?’” The truth is, pros have a whole bag of tricks for setting themselves apart from the pack and, like your auto mechanic, they use different techniques for different situations. However, there are some things that are common to most images, like getting the exposure and focus right, cropping and sharpening. I hear about these things all the time in this forum, but rarely hear about one of my favorite tools; “Levels” and that’s unfortunate, because I would estimate that fully 90% of the images I see posted here would benefit from a Levels adjustment. No, it won’t make you a pro, but it will be a big step in the right direction. Here, very briefly, is how I was taught to do it: (Note; I am going to describe this process using PS, but I assure you, both Elements and GIMP work the same way with only very minor variations.) 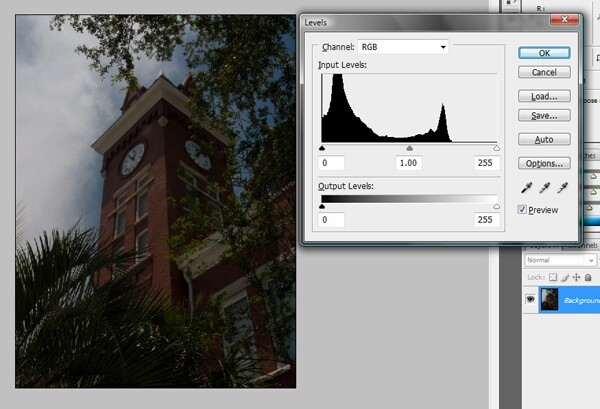
First, make a copy of your image. You’re going to want to have the original just in case, though I don’t think you will need it. Click on Image/ Adjustments/Levels or Crtl ‘L’ in PS to pull up the levels adjustment tool. Here you will find a graph that looks a lot like a histogram and for good reason: it is a histogram. All of the values, light to dark, are represented in this graph. Beneath the graph you will see three sliders, one black, one white and one gray. These represent the white value, the black value and the ‘gamma’ or overall lightness of your image. Don’t touch these yet. You should also see three eyedroppers with the same shades in them; white gray, black. These are wonderful little tools that allow you to assign values to your image. Click on the white eyedropper and move it over to the lightest part of your image. If you have clouds, try to find the whitest part of the whitest cloud. Move the eyedropper to that spot and click. You may notice a change in your image. Great, but don’t worry if you don’t. Next, do the same with the with the black eyedropper. Did you see a change? Keep going.
The gray is a bit tougher. You do not have to find middle gray, but you do need to find a neutral gray. I usually look for something I know to be white, but is gray in the image because it is in shade. The bottom side of a cloud works great or the wrinkles in a white shirt; just click on that area. This is usually the gray dropper where you see the biggest color shift, and for a reason: You have just corrected the white balance in your image, and, if you have done it right, removed any color cast. But that’s not all. Look at your histogram. It may look a bit funky with white gaps and tall black lines, but you have spread the tonality across the gamut of the graph. If your values were mostly in the lower register, you will not see that they are spread throughout, thus taking full advantage of the tonality available. This is also as accurate as this image can be given the exposure when it was taken. 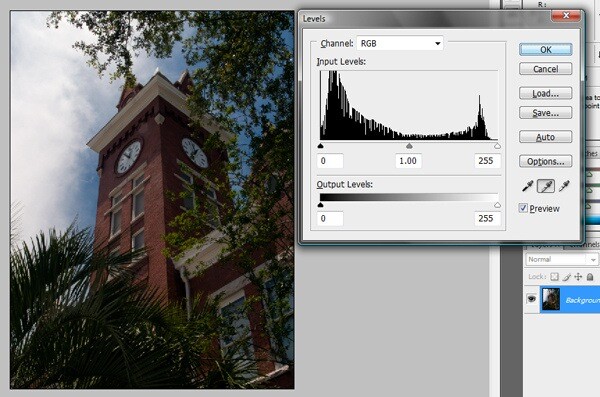
Now, one last adjustment before you close the levels menu. Take the little gray slider in the middle of the graph and slide it up and down a bit. You will notice the image getting lighter and darker. Find the spot where things really ‘pop.’ There you go. In most cases you will find you have a remarkably improved image. Click off the layer you just made and look at the before image. Look better? I’ll bet it does. However, that does not mean you have to stay here, take this in whatever direction you choose, just know that you are starting with a very accurate image. Finally, don’t stop with this quick and dirty method for settings ‘Levels’; there is much more to be learned, and gained. I highly recommend you check out this site where Scott Kelby goes into more details on this method along with his remarkable trick for finding middle gray. Plus, if you scan up on the site you will learn the method for setting the white, black and gray points in the image just like the pros do. Final image: 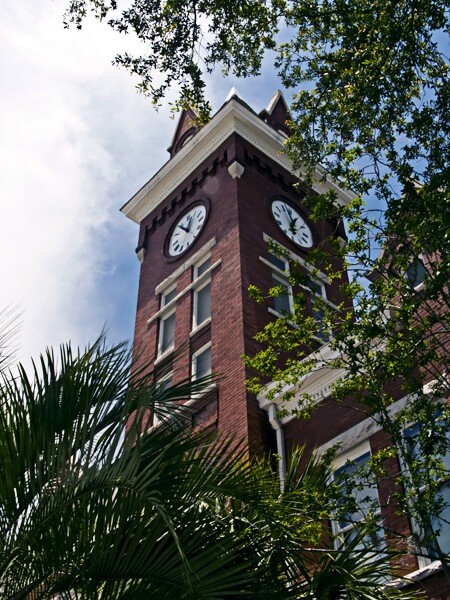
Post originally from: Digital Photography Tips.
Check out our more Photography Tips at Photography Tips for Beginners, Portrait Photography Tips and Wedding Photography Tips.
Levels: Getting the Professional ‘Pop’ | 

No comments:
Post a Comment